Posts

Showing posts with the label DIY

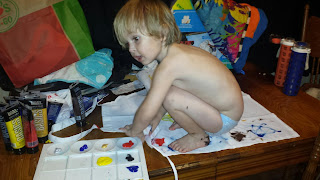
Finger Painting Artwork

Image
I was looking through all my pins on Pinterest the other day, trying to find my next project to work on and this birthday artwork project seemed to jump out at me: Way back in March of 2012, Julia from  551 east , let her two year old paint on a canvas for his birthday.  The caption under my pin mentioned taping a number on the canvas and then letting your child paint. That way you can peel off the number afterwards and have artwork that shows how old they were when they made it. And I just loved the idea so much and with Lion's birthday was creeping up, I knew this would be a fun project to do with him.  I really wish I had found this when Blue was turning one, but I'm glad that I can do this for Lion. (And make Blue his own canvas to paint on too!) Experiment Have the kids paint some birthday number artwork Results I used two  14x11 canvases because I had a couple of spare ones laying around. (The size of your canvas doesn't really matter. I j...

Chalkboard Paint

Image
Update 7/20/16: The instant I posted I knew it just wasn't right. I somehow turned painting on chalkboard paint into a full on project, which it really isn't. Its just a fun decoration idea. So I decided to rewrite it as such! This week I wanted add another topic to the blog. For a while now I've just been copycat crafting and writing if I thought it was a good idea or not. So I decided to try my hand at decorating ideas from Pinterest. I am in way an interior designer, but I know what I like and I know what Mike likes, and I want to make the effort to decorate our house and I encourage you to try it too. So to kick off this segment, I thought I would try out chalkboard paint. I've loved the idea of chalkboard paint for a while now. (I mean who doesn't like coloring with chalk?). And when Jessica Simpson posted this picture to her Instagram (Photo from Jessica Simpson's Instagram ) I knew I wanted to try to recreate something similar in my house (an...

Copycat Gatorade vs. Real Gatorade

Image
Living in Florida is like living in paradise. The sun's generally always out (except for our daily rain storm during the summer) and it's generally warm to hot all year long. But June, July and August are just extremely hot. So hot that most Floridians either spend the summers indoors or hanging out by the beach or pool. (It really is too hot to do anything else.) However, this is the time that Mike decided to start re-flooring our patio. I always say when inspiration hits you have to run with it, so I can't really fault him for the poor timing. (And he's been meaning to get out there all year). As if the universe knew what was happening in our house, I stumbled upon a recipe to turn Kool-Aid into Gatorade. At first I was intrigued, but didn't really think it would that well. The more I watched Mike sweat, the more I wondered about turning Kool-Aid into Gatorade. Finally  I knew I had to try it and Mike would be the perfect person to test it out on. The Project...

DIY Name Crib Bumper

Image
AKA the infamous project that took up most of my free time! Anyway right after we had Blue I knew I wanted to make his crib bumper and spell his name out with nautical flag letters. And considering I had no idea what I was doing, it turned out pretty nice. I just had some fit issues around the corners and had to put in some filler pieces. So even before we were trying for Lion I knew I wanted to make crib bumpers for all of my kids. And yes I know they are totally frowned upon nowadays, but I like the way they look in the nursery and all of our children sleep in our bedroom until they are past all dangers. (Lion just turned 10 months and he's still sleeping in his co-sleeper, so I think he'll be okay with the crib bumper once we move him into his own crib) Luckily after a little research on Pinterest I stumbled upon  LeanneBarlow; Elle Apparel . Which gives a full tutorial on how to make everything you need for your crib. Along with a great tutorial on how to make ...

Activity Book: T is for Time

Image
I'm back again with another update for my activity book. For this next page I decided I wanted to work backwards. I knew somewhere in my book I wanted to put in a clock. I realize that by the time either one of my boys learn to read a clock they'll know longer be playing with the activity book, but I just wanted to get them used to what a clock looks like and a little bit on how it works. Plus Blue so far is happy to point out all the numbers around the face to me. So once I had the idea for the page, I knew there was no better letter for this than T. So without further ado here is my page for T is for Time. Here's What You Need: Dark Purple felt White Felt Black Felt Assorted Buttons Needle and Embroidery Thread Scissors Optional: Drawing Compass Here's How You Do It: Step 1: Create the Clock Face Cut a large circle out for your white felt (approximately with 6 inch diameter). I traced a large coffee container to create my circle, but you could ...

DIY Father's Day Apron

Image
This year is a very special Father's Day for us in the Lietz household as it is also Blue's birthday. So for Father's Day I knew I had to find a project that I could make not only for Mike but also that would work for Blue as well. Mike is the chef in our family and Blue's getting to that age where he wants to help us with everything. So I thought the perfect gift for the two of them would to make them some aprons. And really its a good gift to give your own cook at home and not just a good Father's Day idea. Here's What You Need: Adult Apron  (It's a set of two so you can either make one for yourself or just have a spare handy) Kid's Arpon Pellon 805 Wonder Under Fusible Web Heavy Duty, Fabric Paint 1/2 yard of Flannel Fabric (or whatever spare fabric you have lying around) Needle and Embroidery Thread (or a Sewing Machine) Scissors Optional:  Foam Brush Set Optional:  Scotchguard Here's How You Do It: (If you would lik...

Activity Book: B is for Button

Image
All right here we are again with the next page in my Activity book! This time I went with the letter B and decided it was time for a page to help with fine motor skills. So I went with a B is for Button theme.  Originally I inspired by this page here: (Photo Credit:  The Montoya Family ) And I thought it would be nice to put button holes in the shapes and have them button into place. That way shapes could be learned and matched up. My downfall was that I've grown weary of always sealing up my edges with a blanket stitch, so I tried to sew the sides together and then flip it right side out and slip stitch the rest together. I ended up with some wonky looking shapes. And only my heart ended up looking like it should have. So I went back to Pinterest and began looking at various quiet books. Eventually I found this page right here: (Photo Credit: MjsFeltCreations ) I thought it was really charming and an interesting way to use buttons without being a lite...

May Monthly Project: 1 Container 4 Toys

Image
For this month's monthly project I found a a nifty idea from The Imagination Tree  that turns a basic cylinder container into toys for babies and toddlers.  I really love this idea of taking everyday containers and making toys of them. Especially since baby Lion is at the age where Gerber snacks are his favorite things, so I have plenty of extra cylinder containers laying around.  So here is my take on it. You could easily make all four in a weekend. Or you could spread it out and make one every weekend for a month. Either way its a great toy for your kids without spending a lot of money. For All Four Toys Here's What You Need: 1 Cylinder Container Spray Adhesive Fabric Box Cutter/ Exacto Knife Hot Glue Gun/ Fabric Glue Here's How You Make Them: Ribbon Pull Toy Extra Supplies Needed: Ribbon Here's How You Do it: The first thing you do is mark and  cut out squares all over your container, making sure that for every h...