Posts

Showing posts from April, 2016

Plastic Bag Basket

Image
April is quickly coming to an end, so that means its time for my Monthly Project! This month's project features the number one item I have in my house (and I'm sure you have quite a few of them laying around yours as well): The Plastic Bag!  You know I've been trying to do something with all my plastic bags for years now and I've just never really found anything that fit what I wanted to. So what's a girl to do? Take a little inspiration from various projects and turn it into something I knew I could create! So without further ado here is how I turned plastic bags into a plastic bag basket (pictures will be coming soon Here's What You Need: Plastic Shopping Bags (The more you have the bigger the box you can make) Scissors Heavy Duty Needle and Thread Clips Empty Cardboard Box  Here's How You Do It: 1. Braid plastic bags into a rope First you lay your bag out flat with the sides tucked in; cut off the top and bottom Pull out the sides; St

Monday Free Write

Hello All! I think last week I had my most successful week on the blog yet!  And it really makes me hopeful that maybe I can really do this thing after all. I just need to follow up this week with an equal good week. And I think then I'll start working on the finer points of this blog (like maybe coming up with a real name...) I guess that's all I have to say until next time! 

DIY Pin Cushion

Image
The top right drawer of my desk is slowly being transformed into my sewing supply drawer. My first step in to completing this project is finally creating my own pin holder. I've been playing around with making a pin cushion for a while now, but my sewing skills aren't that great yet. And well I was never quite sure where to start. Then I stumbled a blog post talking about using a magnetic pin bowl instead of the standard pin cushion. And I knew that was what I wanted to make. Here's What You Need: Square Magnets , $5.18 Felt Duct Tape Needle and Thread Scissors Here's How You Do It: Create a Felt Box:  Cut out a 5x5 inch square out of your felt. Cut out triangles out of the corners of your square. (Like so): Next pin together the sides. Stitch the sides together.  Repeat the steps using a 4x4 inch felt square to create a lid. Create a Magnet Box Arrange your magnets into the following panels: 1- 2x2 Square 4- 2x1 Rectangles Using t

Activity Book: A is for Apple

Image
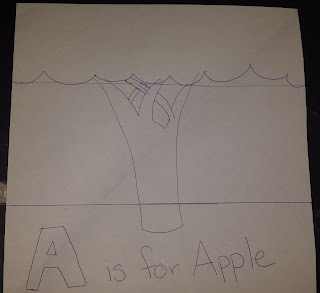
I've been seeing a lot of various Quiet Books on Pinterest lately. At first I thought it was a neat idea, but I don't really take the boys anywhere that I need something to entertain them for a while. Then I saw the idea presented as an Activity book and all my creative juices started to flow. And now that my mom is about an hour and half away from I tend to visit her at least once a month and it would definitely be useful to entertain Blue (and eventually Lion). So here's my start to my Alphabet Activity Book. One page at a time; Two pages a month (Because I'm a busy working mom and that's all I can handle right now) First letter up is Letter A. Here's What you Need: Light Blue Felt  Green Felt  Light Green  Brown Felt  Apple Buttons Embrodery Thread Ribbon Here's How You Do It: 1. Using some scrap paper, make a rough sketch of what you want your page to look like. (Here's my very rough sketch) 2. Cut the brown felt int

Monday Free Write

Hello all! That boy of mine has decided that we need a schedule. And he so nicely gave me Monday and Friday mornings to work on my projects (while he gets Tuesday, Wednesday and Thursday). I'm not very pleased with the arrangement, but after having the weekend to cool down, I've decided to make lemonade out of his scheduling lemons. First order of business is to move my Monday Free Writes to Monday afternoon instead of Monday night. It just seems to make more sense this way. So here we go with the first one! I've finally got to work on my activity book! However much like the crib bumper I think its going to take me a while to finish. I will however be able to make posts for each page. This way you can see the updates along the way. As for the crib bumper, it hopefully should be done by June. That's my goal at least. And I think with this new schedule if I can just work on it during Lion's naps. I should be able to make good progress on it and still be able t

DIY Stuffed Animal Net

Image
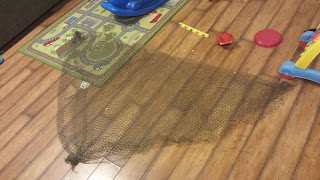
Growing up I always remember being able to store my stuffed animals in their own little hammock. I just loved the idea of having a place to store all of my buddies and still being able to get to them whenever I wanted. I knew that when I had kids they needed to have the same thing. And despite currently having two boys, they still have a bunch of stuffed animals, so it is completely useful to store them. In full disclaimer it is cheaper to buy a stuffed animal hammock and hang it yourself, then making this one. But I wanted a ocean themed kids room, so this fits with the theme perfectly. Here's What You Need: Nautical Decorative Fish Net , $16.95 3 6"  Shoreline Marine Galvanized Cleat , $3.34 each Braided Rope 9 Feet/Pkg-White , $6.18 Screws and a Screwdriver Scissors Optional:  South Bend Monofilament Fishing Line , $1.74 Here's How You Do It 1. Lay the net out flat. Fold up one corner to create a triangle. Cut off the excess net off the triangle. Knot th

Monday Free Write

Hello All! It's been a very productive week for the blog (online and off) and I can only hope that I can keep up this posting schedule. As for the blog, I think slowly over the next six months or so, I plan to convert the blog into an actual website/blog. I have a vague idea of what I want it to look like, so I'm going to take the time needed to get it there. And as for my various projects,I'm still working on Lion's crib bumper. It'll hopefully be ready within the next month and a half or so. (I really do need to put more time into than I actually do anymore) I've begun work on an activity book for Blue and Lion. So expect a bunch of posts regarding that later this month. And who knows what else I'll find on Pinterest that peaks my interest.

Monday Free Write

Image
Hello Again! I realize it's been about two weeks since I last posted, but well my boyfriend's schedule changed unexpectedly. And I've been balancing my mom duties with my real job. And well somehow the blog got pushed to the back burner. My crafting and organizing did not. ' Here's a little sneak peak of what's to come hopefully in the next month: So hopefully now that you've seen what I plan to do, I'll actually keep up with it!