Activity Book: B is for Button
All right here we are again with the next page in my Activity book! This time I went with the letter B and decided it was time for a page to help with fine motor skills. So I went with a B is for Button theme.
Originally I inspired by this page here:
 |
| (Photo Credit: The Montoya Family) |
And I thought it would be nice to put button holes in the shapes and have them button into place. That way shapes could be learned and matched up. My downfall was that I've grown weary of always sealing up my edges with a blanket stitch, so I tried to sew the sides together and then flip it right side out and slip stitch the rest together. I ended up with some wonky looking shapes. And only my heart ended up looking like it should have.
So I went back to Pinterest and began looking at various quiet books. Eventually I found this page right here:
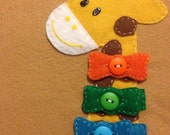 |
| (Photo Credit: MjsFeltCreations) |
I thought it was really charming and an interesting way to use buttons without being a literal button page. And I knew instantly this is what I wanted my button page to look like.
Here's What You Need:
- Assorted Buttons
- Yellow Felt
- Brown Felt
- Peach or White Felt
- Large Piece of Blue Felt (or whatever color you want your background to be)
- Green Red and Blue felt
- Needle and Embroidery Thread
- Scrap Paper
Here's How You Do It:
1. Create The Giraffe
I'm sure you can find giraffe patterns if you search Pinterest, but I decided to free hand a pattern using a plain piece of paper. Here's roughly what I came up with:

2. Creating the Bow ties.
Using your red, green and blue felt (or whatever three colors you like) create strips as long as your giraffe's neck and about 1/2 to 3/4 inch wide. Sew those down onto your giraffe's neck. Sew down a button into the center of each strip.
It'll look something like this:

3. Finishing Touches.
Now that everything is in place for your giraffe, its time for some finishing touches. First step is to cut out a letter B out of some scrap fabric and sew that down onto the page. Next is to backstitch on the words 'is for Button'.
Here's What The Finished Product Looks Like:

Comments
Post a Comment